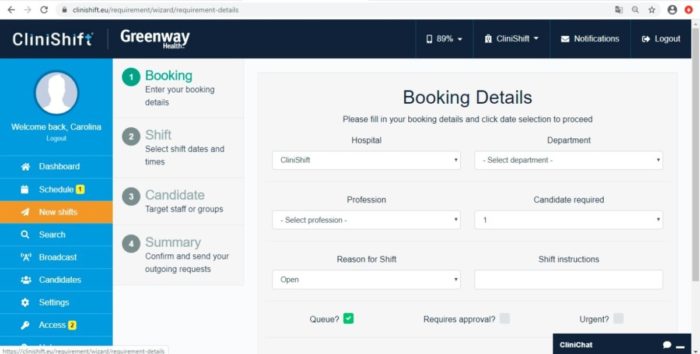
To create a new shift you need to fill in the information contained in the ‘New Shifts’ tab as per image below. There are 4 steps to completing this quick form: 1- Booking, 2- Shift, 3- Candidate, and 4- Summary.
1. Booking
You will only need to chose a different hospital if you are operating with multiple facilities, otherwise that will be standard. Next, you must choose the ‘Department’ you are looking to fill a shift in. ( i.e. ICU, Radiology, Oncology, or whatever departments are relevant to your facility, the hierarchy of departments in your organization should have been set up during initial roll out, however you can add to this list in Settings at any stage). The Profession type will reflect the type of candidate you require to work the shift such as Nurse or Healthcare Assistant. Candidates required denotes how many candidates you require for that particular shift you are about to create. Reasons for that shift, this list has also been previously populated at set up stage and are unique or relevant to your facility. (for example reason is escalation) The selected ‘reason’ is for internal records only and is not viewable by candidates. Finally, you can add any particular instruction associated with the shift that is needed, please note this field is not mandatory. There are various ways to send out a shift request, by selecting one or more options such ‘Queue’, ‘Requires approval’ and/or ‘Urgent’ . The Queue – First, you can select the option to set up a ‘Queue’ which will be a direct, targeted shift request to individual candidates. The queue allows Managers to set up a shift request while relying on CliniShift to do the work in ensuring the shift gets filled. The first candidate in the queue to accept the shift will be the successful candidate. Alternatively, the shift can be sent as an ‘open shift’, by selecting the option ‘Requires approval’. An Open Shift will appear differently in the CliniShift App and a candidate can only apply to work it. A Manager must then select the most appropriate candidate from the list of applicants who applied to work the shift. Finally a shift can be marked as ‘Urgent’, meaning that the shift will be sent to all suitable candidates at the same time letting them know that there as urgency to that particular shift request. It will appear with a warning symbol in the CliniShift App and it will be filled by the first candidate to accept it.
2. Shift
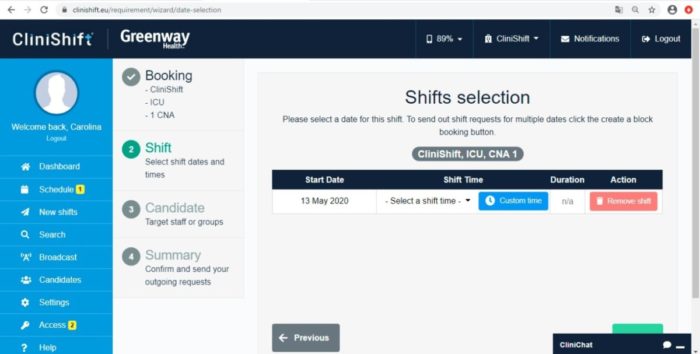
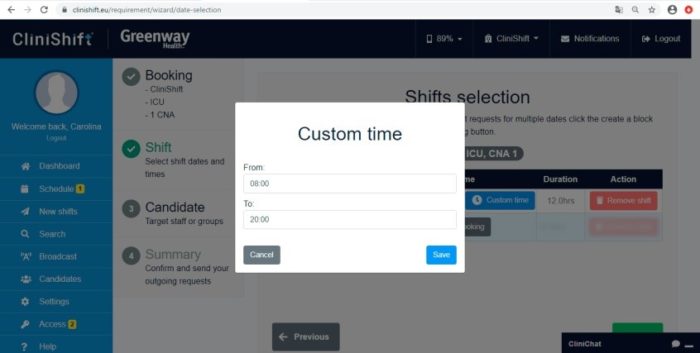
On step 2, you will be able to select further details about the specific requirements of the shift, such as the date and time it is to take place. The shift details created so far in stpe 1 will be displayed on the left under the heading “Booking”. Please see below The shift times can be pre-defined in line with your Organizations requirements during the initial stages of set up allowing you to choose the most appropriate shift time slots, or you can customise the time for that particular shift by manually inputting the start and finish time.
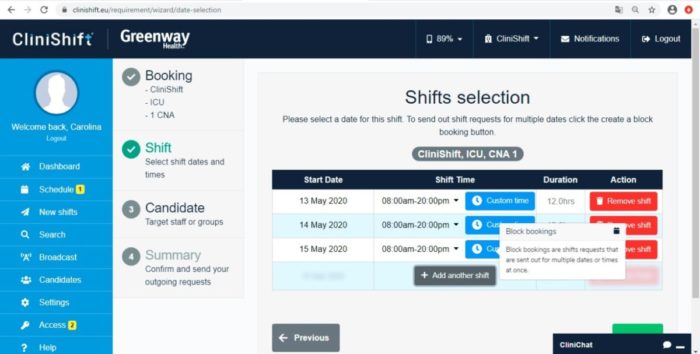
It is also possible to create a ‘Block Booking’ from this page. This function allows the same shift to be replicated for consecutive dates. This might occur when you know a staff member has called in sick or is unavailable; you can now fill all those vacant shifts in one booking.
3. Candidate
At this stage you will have the option to select candidates for that shift from all staff or from a group. (Candidates should be part of at least 1 group, please refer to Settings for more info) To see all candidates select the option ‘Select Candidates’, you can select the candidate(s) you wish to send that shift request to, the shift will appear in the blue banner ‘Block Booking’ as per image below, and there are filters to help you sort through, you can also use the search bar to find a candidate by name.
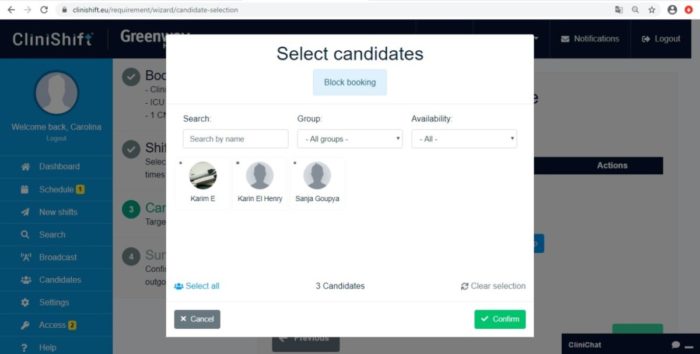
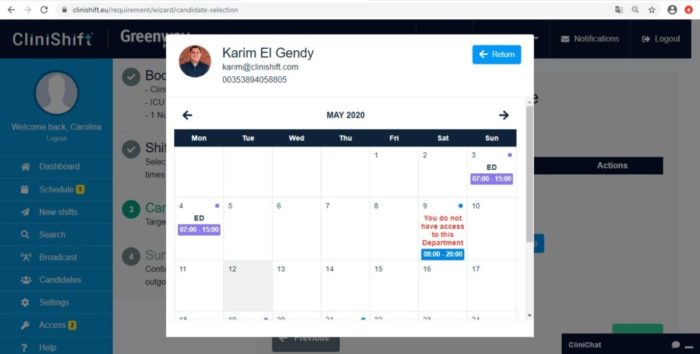
The dot in the top left corner of each candidate indicates the availability of this candidate to work the shift(s) you are creating, by double clicking on a candidate you will be able to see that staff members schedule.
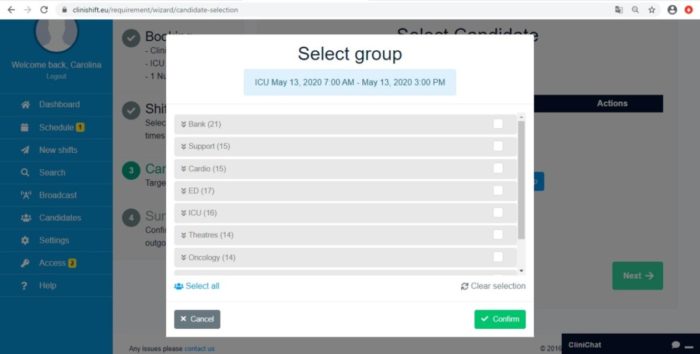
Using the ‘Select Group’ tool, you will see a list of all groups you have available and you will be able to select all candidates that belong to that group, please see the example below
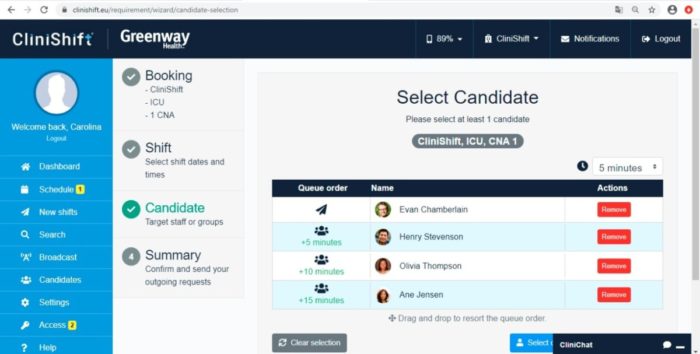
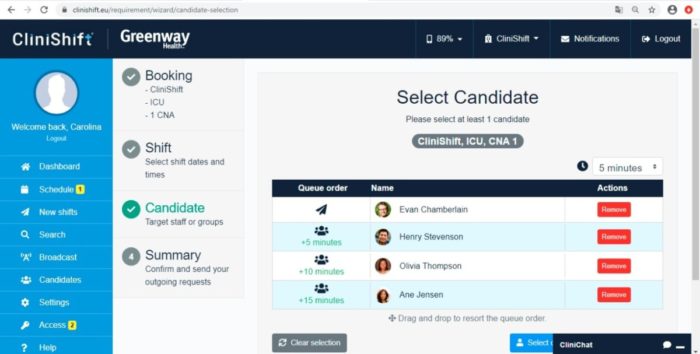
Once you have selected the option to use the ‘Queue’ and after you select the candidates, you will be able to arrange the order of the candidates, by dragging and dropping their names on the list. You can select the interval you wish the shifts to be sent between candidates, by selecting it on the top right corner of your list, as per image below.
4. Summary
Here you can review all the details for the shift you have just created; once you are satisfied all the shift details are correct click ‘Send Requests’ at the bottom right of your page.
If you wish to remove a shift or a candidate you can use the action buttons at this stage, in case further editing is required you can navigate the steps using the menu on the left or by using the button ‘Previous’. Congratulations you have just sent a shift request!
